How to Adjust Well Pump Pressure Switch Settings
The standard pressure switch setting for most residential wells is 30/50 PSI, meaning the pump turns on at 30 PSI and shuts off at 50 PSI. If your water pressure feels weak or the pump cycles differently than expected, adjusting the cut-in and cut-out settings is a 15-minute job with a single nut driver. No plumber required.
This page covers the full adjustment process. If you’re not sure the switch is the problem (versus the pressure tank or the pump itself), start at the pressure switch guide to diagnose first.

Tools and materials you need
Gather these before shutting off power:
- 3/8” nut driver or adjustable wrench
- Flathead screwdriver (for cover removal and nut adjustments)
- Pressure gauge: if one isn’t already installed on your system, you’ll need one to confirm the new settings; see how to install a pressure gauge
- Flashlight: pressure switches are often in dim basements or pump houses
- Pen and paper: write down your current settings before you change anything
Safety first: Turn off power at the circuit breaker before removing the switch cover. Pressure switches operate on 240V. Working with the power on risks a serious shock. For EPA guidance on private well system safety, see the EPA well water protection guidelines{:target=“_blank”}.
Video guide
Video: “How To Adjust a Pressure Switch” by R.C. Worst & Co.
Understanding the two nuts
Open the pressure switch cover (one screw on top, or a snap cap depending on the model) and you’ll see two threaded nuts on spring-loaded posts. Most homeowners have never looked inside one before. Here’s what each nut does:
Large nut (range nut): This nut adjusts both cut-in and cut-out pressure at the same time, keeping the gap between them constant. Turn it clockwise to raise both settings, counterclockwise to lower them. One full clockwise turn raises both by approximately 2 PSI. This is the nut you turn for almost every common adjustment.
Small nut (differential nut): This nut controls only the gap between cut-in and cut-out. The standard differential is 20 PSI (e.g., cut-in 30, cut-out 50). The small nut should rarely be touched. Adjusting it incorrectly can cause the switch to malfunction or the pump to short cycle. Leave it alone unless you specifically need a different differential and understand the consequences.
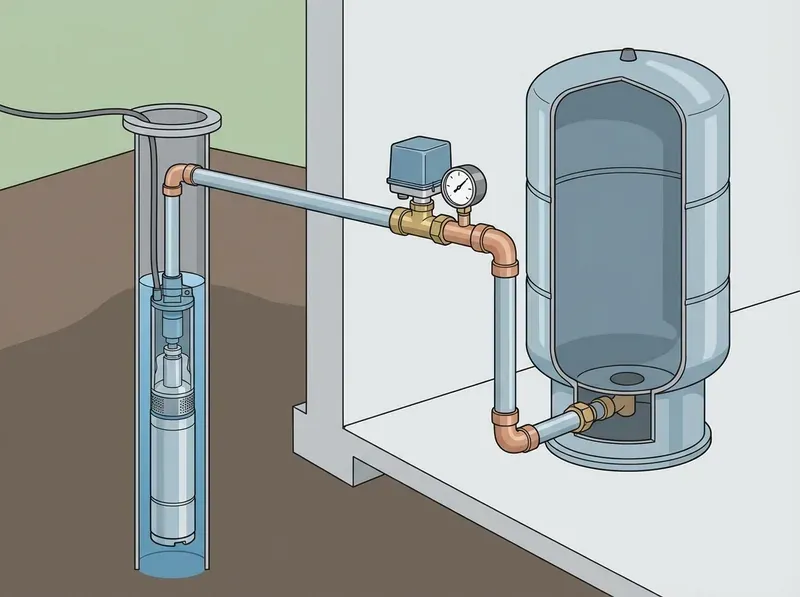
The pressure switch is mounted on a 1/4-inch tube near the pressure tank. According to R.C. Worst pressure switch specs{:target=“_blank”}, compatible replacement switches for the most common residential installations are rated for 30/50 or 40/60 PSI and are broadly interchangeable by thread size.
Step-by-step adjustment
-
Turn off power at the circuit breaker. Locate the double-pole breaker labeled “well pump” or “pump” and flip it off. Confirm the pump is off by running a faucet until pressure drops without the pump starting.
-
Remove the pressure switch cover. Most covers have one Phillips screw on top. Others snap off. Set the cover aside.
-
Identify the two nuts. The large nut sits on the taller spring (usually toward the center). The small nut is on the shorter spring. If there’s only one nut, your switch uses a different design; check the manufacturer’s instructions.
-
Write down your current settings. Note what your pressure gauge reads at cut-in (when pump turns on) and cut-out (when pump turns off) so you have a baseline.
-
Decide what you’re adjusting. If you want more pressure throughout the house, turn the large nut clockwise. If pressure is already too high, turn it counterclockwise. Do not touch the small nut.
-
Turn the large nut one full turn in the desired direction. This changes both cut-in and cut-out by approximately 2 PSI. For a 2-story home needing higher pressure, you might turn it 2–3 full turns clockwise to shift from 30/50 to roughly 34/54 or 36/56 PSI.
-
Replace the cover. Restore power at the breaker.
-
Run water and watch the gauge. Let pressure drop to cut-in and watch the pump kick on. When the pump stops, check the cut-out reading. Compare both to your target settings.
-
Fine-tune in 1/2-turn increments. If cut-in is at 32 and you want 30, turn the large nut counterclockwise a half turn, run the test again.
-
Replace the cover when satisfied. Snap it back on or reinstall the screw. You’re done.
Common pressure switch settings
| Setting | Cut-In | Cut-Out | Best For |
|---|---|---|---|
| 20/40 PSI | 20 PSI | 40 PSI | Single-story homes, low-flow wells |
| 30/50 PSI | 30 PSI | 50 PSI | Most residential wells (standard) |
| 40/60 PSI | 40 PSI | 60 PSI | Multi-story homes, high-demand fixtures |
The 30/50 setting is standard for most homes. Homeowners moving to 40/60 PSI get noticeably better shower pressure in two-story homes, but the pump runs longer per cycle and the pressure tank bladder works harder. If your well yield is low (slow recovery), sticking with 30/50 puts less strain on the system.
We recommend checking the tank pre-charge any time you adjust the cut-in setting, skipping this step is one of the most common causes of short cycling after a pressure switch adjustment. Your pressure tank’s pre-charge pressure should always be set 2 PSI below cut-in. On a 30/50 system, pre-charge should be 28 PSI. If you change cut-in from 30 to 40, also adjust the tank pre-charge to 38 PSI; otherwise the tank won’t deliver the full draw-down volume it’s designed for.
When adjustment won’t fix the problem
Not every low-pressure problem is a settings problem. Stop adjusting and move to diagnosis if:
-
Contacts are burned or pitted. A visible black mark or char on the switch contacts means the switch is failing electrically. Turning the nuts won’t help; you need to replace the pressure switch entirely.
-
Pressure drops immediately after the pump stops. If the gauge falls from 50 PSI to 30 PSI in seconds (instead of minutes), the pressure tank has lost its air charge or the bladder has ruptured. See our guide on pump short cycling and well pump troubleshooting for next steps.
-
Pump runs continuously but never reaches cut-out. The pump can’t build enough pressure to trigger shut-off. This points to a pump output problem (worn impeller, low well yield) or a large leak in the system, not a pressure switch issue.
-
Pressure varies wildly from hour to hour. Inconsistent pressure despite normal-looking settings often signals a partially collapsed drop pipe or a failing pump motor.
FAQ
What is the best pressure setting for a well pump?
The 30/50 PSI setting works for most single-story homes with standard fixtures. Multi-story homes or homes with low pressure at upstairs showers benefit from 40/60 PSI. The right setting depends on your home’s layout and flow demand, not the pump’s horsepower rating.
Can I increase my well pressure to 70 PSI?
We don’t recommend it. A cut-out of 70 PSI exceeds the rated working pressure of most residential pressure switches (typically 65 PSI maximum) and approaches the limits of standard bladder tanks. Beyond 60 PSI cut-out, you risk switch failure, bladder rupture, and voiding your tank warranty. If 60 PSI isn’t enough, a booster pump is a better solution than pushing the pressure switch to its limits.
Which nut do I turn to increase water pressure?
Turn the large nut (range nut) clockwise. One full clockwise turn raises both cut-in and cut-out by approximately 2 PSI. The small nut controls only the differential (the gap between cut-in and cut-out) and should not be used for general pressure increases.
How often should I adjust my pressure switch?
Only when something changes: a new appliance that needs more pressure, a change in household size, or an indication that settings have drifted. Pressure switches don’t require routine adjustment. If you find yourself adjusting it frequently, the switch is likely failing and should be replaced.
Need the broader picture? Our pressure switch guide covers all pressure switch topics including replacement, tank problems, and electrical issues, with a diagnostic decision tree to find your specific problem fast.