How to Install a Well Pump: Complete DIY Guide
Replacing a well pump is one of the more demanding home plumbing jobs. Not because the concepts are complicated, but because a single mistake (a dropped pump, a loose wire connection, a missed pressure test) can turn a $600 repair into a $1,400 one. We’ll walk through the full installation process for both submersible and jet pumps, including the steps most guides leave out.
Before starting, understand the full installation cost breakdown so you know what components you may need to replace alongside the pump itself.
Before you start: safety and scope
This guide covers submersible pump replacement (the most common residential scenario for any well over 25 feet) and shallow jet pump installation and replacement (above-ground pumps for wells under 25 feet). It does not cover new well drilling, which requires a licensed well driller in every state, or pump installation requiring confined-space entry into the well casing.
Critical safety checks before touching anything:
Kill power at the breaker panel, not just the pump switch. The breaker for a submersible pump is a double-pole 230V breaker. After flipping it off, verify it’s dead with a non-contact voltage tester before touching any wiring or fittings.
Check your local code. Many states and counties require a licensed well driller or plumber for any pump work inside a well casing. A permit violation discovered during a home sale can be expensive to resolve. Contact your county health department to confirm requirements before starting.
A repeatedly tripping circuit breaker before you even begin the installation indicates a failed pump motor, not a wiring problem you can work around. If the old pump trips the breaker every time power is restored, the motor is likely seized or shorted.
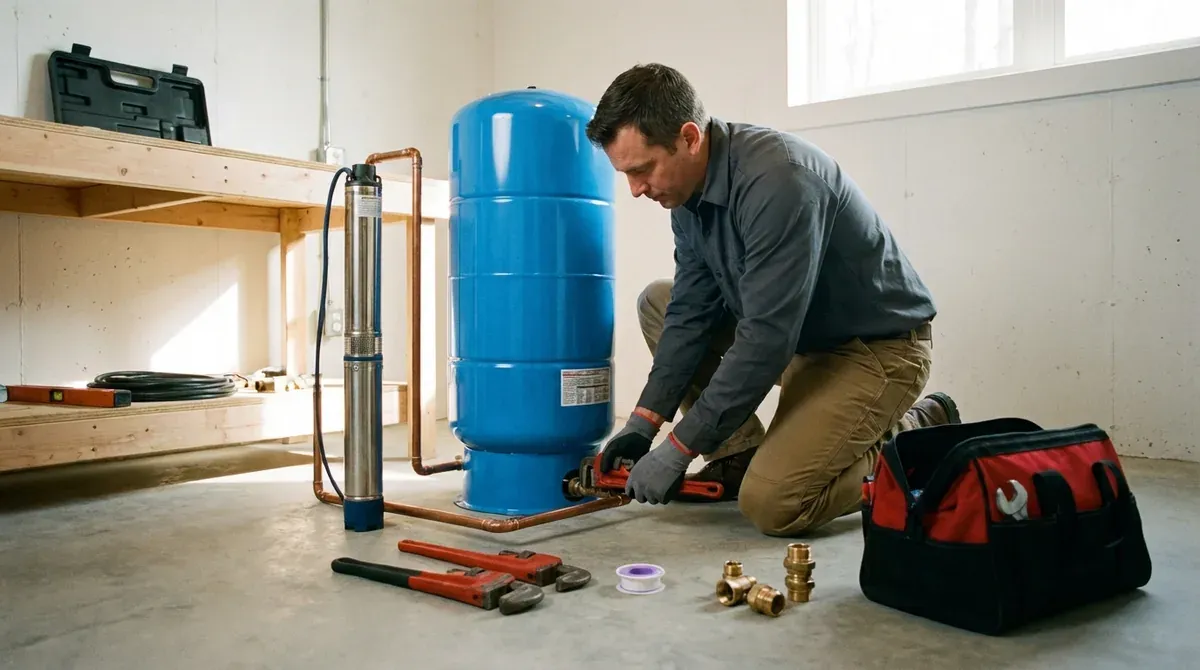
Tools and materials needed
Have everything on hand before you start. You cannot pause mid-installation with the well open.
Tools you’ll need: a non-contact voltage tester (do not substitute a standard multimeter for this step), two pipe wrenches, wire crimpers and waterproof wire connectors (submersible-rated, not standard wire nuts which fail in water), a safety rope anchor rated for the pump weight, a pressure gauge in the 0-100 PSI range, and a torque wrench if your pitless adapter has a torque spec.
For materials: get a replacement pump matched to your existing depth rating and GPM. Franklin Electric, Grundfos, and Goulds are the most reliable residential brands; CountyLine works for seasonal or lower-demand applications. You’ll also need drop pipe in the same diameter as existing (typically 1” or 1.25” Schedule 80 PVC or stainless steel), stainless steel cable or polypropylene safety rope (never standard rope, which degrades in water within a season), submersible pump wire sized to pump HP and depth per the spec sheet, wire connectors rated for submersible use, Teflon tape and pipe thread sealant for all threaded fittings, and a torque arrestor (required for submersible pumps to prevent rotation during startup).
Video walkthrough
Video: “How to install a Submersible Pump” by Engineer775
Installing a submersible well pump
Time: 3-8 hours depending on depth. Difficulty: Hard. Minimum crew: 2 people.
This is a two-person job. One person manages the drop pipe and pump weight; the other manages the safety rope. Do not attempt this solo. A pump that slips into a deep well costs $300-$1,000 to retrieve.
-
Cut power at the main breaker. Verify with voltage tester. Do not proceed until you confirm zero voltage at the wiring junction.
-
Secure a safety rope to the pump body before pulling the old pump out of the well. If the old pump has a safety rope already, inspect it. Standard rope rather than stainless cable may have degraded.
-
Pull the existing pump. Raise the pump slowly by hauling up on the drop pipe, hand-over-hand, while your partner manages the safety rope. Lay each section of pipe to the side as it comes up so you can inspect it for cracks or mineral buildup.
-
Disconnect the old pump from the drop pipe (pipe wrench) and from the electrical connection. Label each wire before disconnecting. Black, red, and green (or yellow-green) should be clearly marked.
-
Attach the new pump to the drop pipe. Apply pipe thread sealant to the male threads. Hand-tight, then 1.5 turns with a pipe wrench. Don’t over-torque; you can crack the pump housing with aggressive tightening.
-
Install the torque arrestor 12 inches above the pump (per most manufacturers’ specs). The torque arrestor compresses against the casing walls during startup and prevents the pump from spinning.
-
Thread the safety rope through the pump’s safety rope eye (not through the drop pipe). Use a stainless steel cable clamp to terminate the rope. Never tie a knot; knots in stainless cable reduce holding strength by 50%.
-
Feed the pump electrical wire alongside the drop pipe. Tape the wire to the pipe every 10 feet using electrical tape. Untaped wire can tangle around the pump during installation or retrieval.
-
Lower the assembly into the well slowly. Add sections of drop pipe as the pump descends. Don’t let the pump contact the casing walls on the way down, since that can damage the casing seal.
-
Reconnect electrical at the control box. Match wire colors exactly to the original connection. For 2-wire pumps (built-in starting capacitor), match the two hot leads. For 3-wire pumps (external control box), the third wire connects to the start winding terminal. Consult the pump’s wiring diagram if in doubt.
-
Restore power briefly to verify rotation direction (if the pump has a rotation indicator light or the controller has a rotation check mode). Then cut power.
-
Submersible pumps are self-priming, so no manual priming is required. Restore power and let the system pressurize. The pressure gauge should begin rising within 30 seconds.
Installing a shallow jet pump
Time: 2-4 hours. Difficulty: Moderate. Minimum crew: 1 person.
Jet pumps are the DIY-friendly option. The pump mounts above ground, connections are standard plumbing fittings, and there’s no in-well lifting involved.
- Cut power and verify with voltage tester.
- Disconnect the old pump from the suction line (the pipe coming from the well) and the discharge line (the pipe going to the pressure tank).
- Note all fitting sizes before removing the old pump. Bring them to the hardware store if you’re unsure of the thread size.
- Mount the new pump at the same height as the old one. The priming port must be accessible.
- Connect the suction line to the pump inlet. Keep suction line runs as short and direct as possible. Every additional foot of suction line reduces lift capacity. Apply pipe thread sealant to all threads.
- Connect the discharge line and pressure tank fitting.
- Wire the pump per the nameplate. Jet pumps are typically 120V or 240V single-phase. Match wire gauge to the circuit.
- Prime the pump before starting. Jet pumps require manual priming at every installation. See our step-by-step priming guide for the exact procedure.
- Restore power and verify pressure cycle. The pump should reach cut-in pressure (30 PSI) within 60 seconds of starting.
After installation: testing and verification
Don’t declare the job done after the first pressure cycle. Run these checks before buttoning everything up:
Run a three-cycle test. Let the system run through 3 complete pressure cycles: pump on at 30 PSI, off at 50 PSI, then pressure drops as you open faucets and the pump kicks on again. Air leaks in fittings appear as tiny sprays within the first few cycles.
Check every fitting you touched, with dry hands. A damp fitting during the first pressurization is a slow leak. Fix it now while the system is still open.
The pressure tank bladder should be pre-charged to 2 PSI below cut-in pressure: 28 PSI for a standard 30/50 system. Check it at the Schrader valve on top of the tank with a standard tire gauge. If it’s off by more than 3 PSI, adjust with a bicycle pump or air compressor after fully depressurizing the tank. See our pressure tank selection guide for sizing guidance.
For a flow rate check, open a faucet fully and time how long it takes to fill a 1-gallon container. Compare the calculated GPM to the pump’s rated output at your well depth. A significant shortfall points to an undersized pump or a drop in the well’s yield.
Franklin Electric and Grundfos controllers have LED indicator lights. Check the controller manual to confirm all lights show normal operation.
When to stop and call a professional
We’ve seen homeowners push through problems that warranted a professional call. Here’s where to draw the line:
If the pump dropped into the well, stop. Call a well driller for retrieval. Pump retrieval requires a fishing tool and often specialty casing cameras. It is not a DIY recovery.
If the electrical connections don’t match, and the old pump’s wiring doesn’t align with the new pump’s configuration (different wire count, unfamiliar terminal labels), call an electrician before connecting anything.
If pressure never builds above 20 PSI, the pump may be undersized, or the well’s yield has dropped below the pump’s demand. Both need professional assessment.
If the breaker trips within minutes of startup, a motor fault is present. Each reset worsens the damage.
If the well produces sand or discolored water after installation, that suggests possible casing damage from the pump pull. Stop using the water and call a well driller to inspect the casing.
For replacement cost context if the pump itself needs to come out again, see our cost to replace a well pump guide.
FAQ
How deep can I install a submersible pump myself?
There’s no hard rule, but we recommend limiting DIY submersible installation to wells under 100 feet. Deeper wells require more pipe weight, longer cable runs, and more physical effort to lower without the pump contacting the casing walls. At 200+ feet, the total weight of the drop pipe, wire, and pump can exceed 100 pounds, beyond safe two-person manual handling.
What size well pump do I need for a 3-bedroom house?
A three-bedroom home with typical water usage needs a pump rated for at least 8–10 GPM. Many contractors size to 1 GPM per plumbing fixture (bathrooms, kitchen, laundry). A standard residential submersible is rated 10-15 GPM, which is adequate for most households. If your family uses a water softener, irrigation system, or large soaking tub, size up.
How long does it take to install a well pump?
A shallow jet pump replacement takes 2–4 hours for a capable DIYer. A submersible pump in a well under 100 feet takes 4–6 hours. Wells over 200 feet can take a full workday, especially when replacing old pipe and wire alongside the pump.
Do I need a permit to replace a well pump?
This depends entirely on your state and county. Some jurisdictions require a licensed well driller for any pump installation; others allow homeowner work with a simple permit application. Contact your county health or environmental department before starting. Getting caught with an unpermitted well installation during a home sale can require expensive remediation.
Can I reuse the existing drop pipe and wiring?
Maybe. Inspect the drop pipe for cracks, heavy mineral buildup, or any UV degradation near the top. PVC pipe older than 15 years in a warm climate is often brittle. Submersible pump wire should be inspected for insulation cracking, especially in the first few feet below the pitless adapter. When in doubt, replace both. The cost is far lower than a second service call if old materials fail.
For a complete cost breakdown before starting, see our well pump installation cost guide.
Source: EPA private wells requirements | OSHA confined space safety | Franklin Electric pump support